Category Archives: Uncategorized

Photographing Small Products for Fun and Profit

Hey Everyone:

Spring cleaning has revealed a slew of small items lying around my home that either need documentation, or that need to be sold online. So, today I'll be sharing some experiences photographing small objects with the intent of documenting a collection, or selling things online. Well-photographed items not only look good, but the images can be sold to stock photography houses, and they definitely improve your sales success online.

Snapshot vs Photograph

I make this distinction often. A snapshot captures photons, but a photograph captures emotion and tells a story. This is especially important for sales, where you only get a few seconds to make that all-important first impression.

The vast majority of online images promoting an item for sale look like this image on the left. While this snapshot, taken with my trusty point-and-shoot camera, shows the product, it's flat and the background is somewhat distracting (I've seen worse, though). I deliberately used the in-camera flash, since this will be the natural tendency of folks when shooting in lower light situations. The image of each radio is very small, with too much space around the objects. The radios get “lost” in the scene. I could crop this tighter, which would improve the image dramatically, but the flatness and harsh lighting would still remain.

The image on the right completely changes the scene. There is no mistaking the subject, your eye is drawn immediately to the radios. The image is crisp and clean. The radios are well lit, and they are clearly three dimensional. There is no distracting background; the background is pure white, matching perfectly the standard white background on websites.

In addition, I have added some subtle shadows that enhance the three dimensional “feel” of the radios. The shadows are applied to give the illusion that the radios are floating just above the table. This adds to the three dimensional effect, letting the viewer get a better feel for the “depth” or “thickness” of the objects. This is especially important for the radio on the left, which is more face-on and lacks interesting extra structure (like a strap or antenna).

Making a Photograph Instead of a Snaphot

The key to producing a photograph of an object is lighting. While this is always the case for any photograph, it's critical for small objects. It's also important to have a very sharp picture. How many blurry pictures have you seen on eBay?

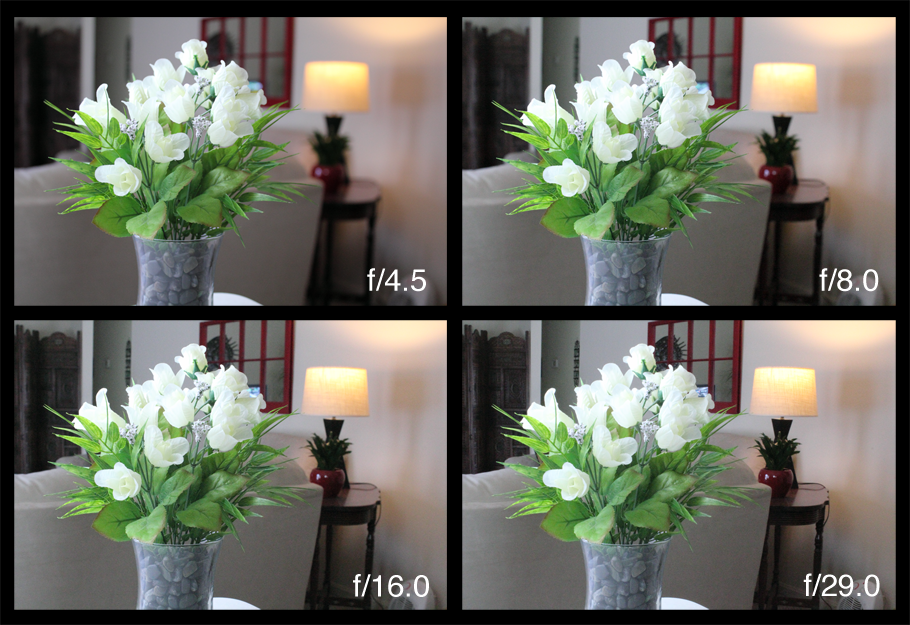
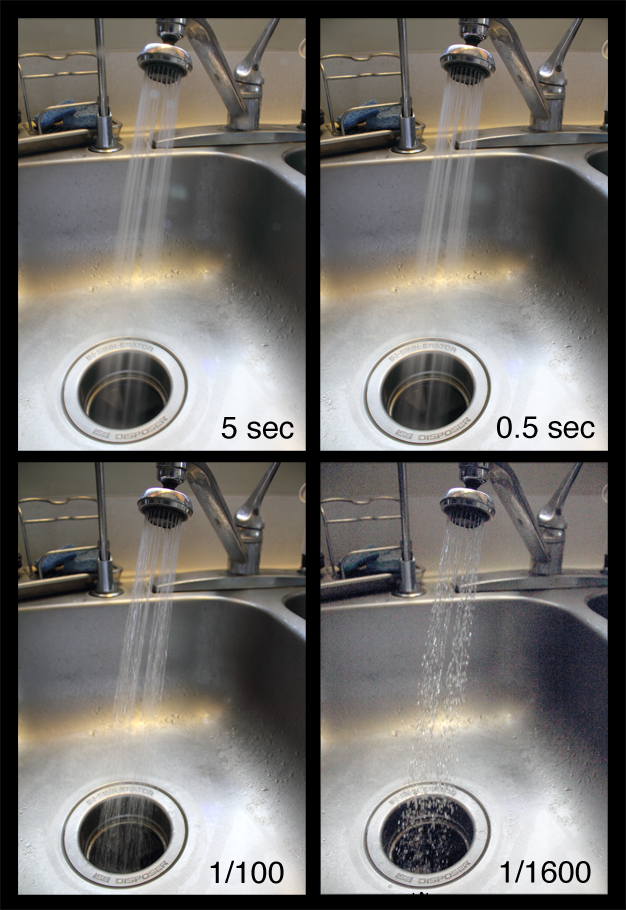
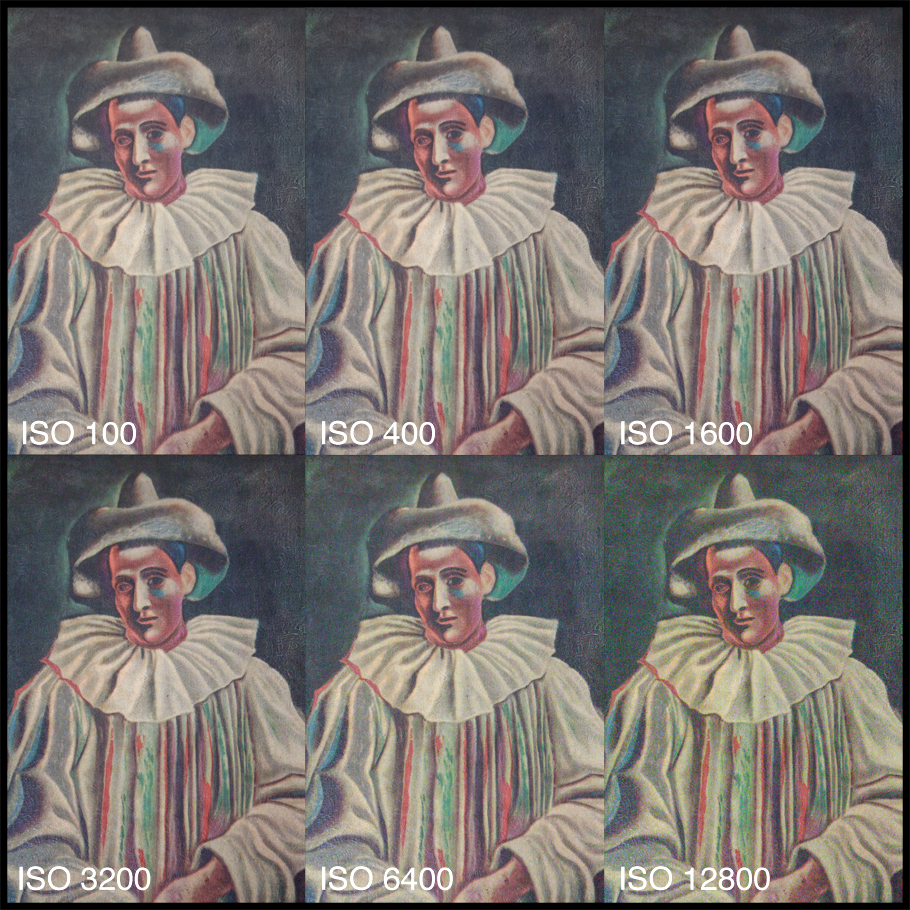
Large Depth of Field (DoF) is important to make sure that all parts of the object are in focus. But this typically means a large f/stop (small aperture), so you will need plenty of light to avoid high ISO Settings and the resultant high noise. (see my post on Aperture, Shutter Speed and ISO Settings).

It is also crucial to shoot your subject against a clean background. While many people like colored or patterned backgrounds, it's always better to shoot against a “green screen” or better yet, a backlit white background. Green screens are great for video, or when you have items with pure white colors. But a white background produces a very clean look, and makes it easy to “knock out” any non-white color. A translucent white background is even better, because you can add a backlight (see below).

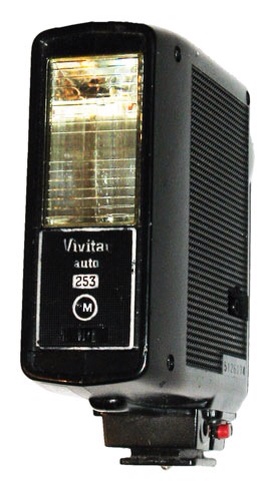
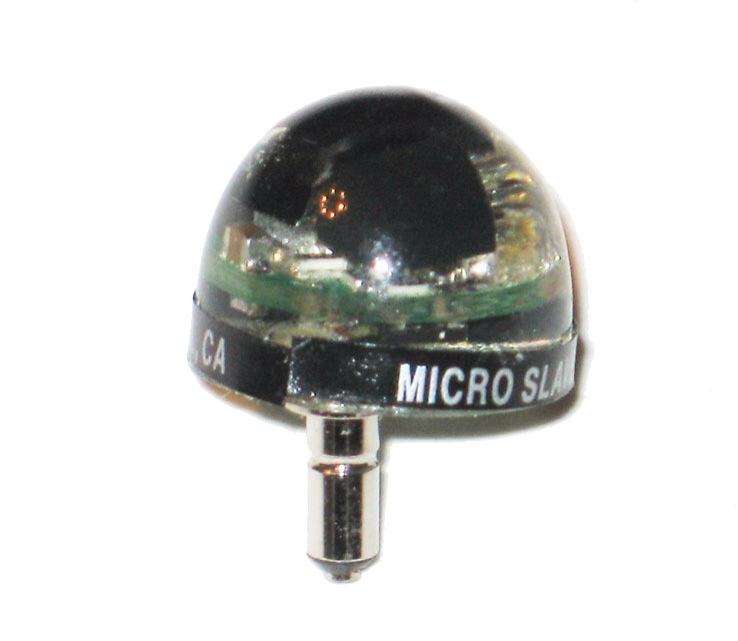
Here's an inexpensive way to achieve a white background. I purchased a white poster board for about dollar at a local hobby store. I clipped it to a fiber board, and propped it in a chair. The smooth slope of the poster board ensures that there is no shadow at a seam in the background. I used my trusty umbrella diffuser to provide a soft general light. I used an off-camera flash, triggered wirelessly, with a diffuser to provide a key light. These sources didn't produce the proper lighting, so I used my old Vivitar flash, with Peanut optical trigger, to provide hard fill light form the right side. [Please read my post about vintage flashes BEFORE you use your vintage flash in any situation with modern DSLR cameras.]

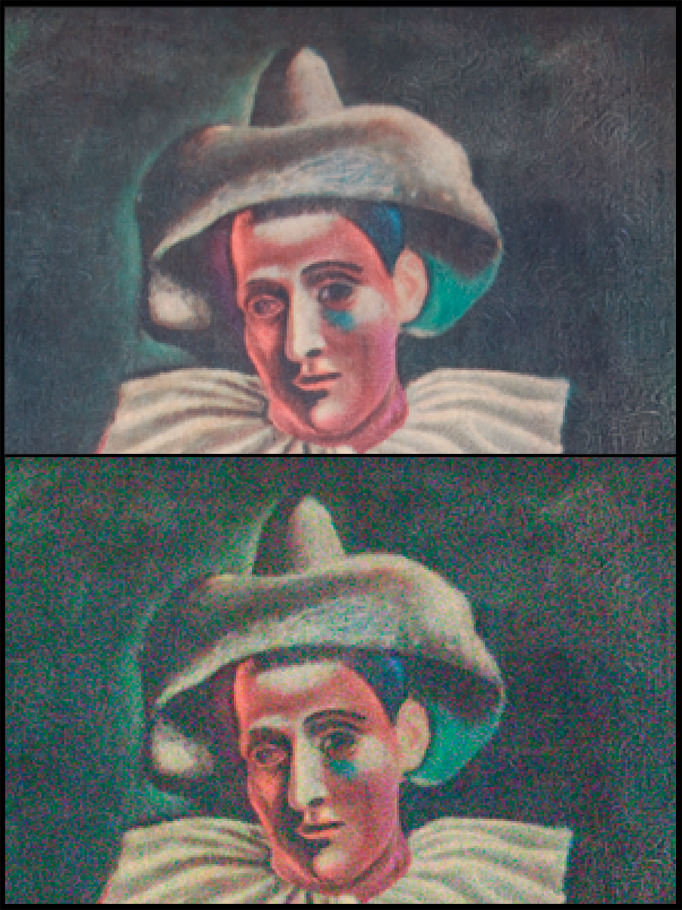
The image to the right was the best I could obtain with this setup. I like it, and it shows off two prize possessions from my youth, but it's not great. The background just wasn't smooth and clean, and the whole scene is too flat. I could have spent hours trying to isolate the objects with the lasso tool in Photoshop and then redo the background, but I didn't want to spend the effort. The flatness is somewhat mitigated by converting the image to B&W. While the figurines are Pewter and appear B&W anyway, the B&W conversion gets rid of many distracting color artifacts. In addition, these images are still fairly noisy, even with the two flashes and umbrella light.

Shooting Tents and Tables

After trying my cheap setup, and producing only mediocre results, I decided to look into a more professional solution. There are many options, but two are most common: shooting tents and tables.

A shooting tent surrounds the subject in a translucent box, and external lights are used to illuminate the box. This provides a very soft and uniform illumination of the subject. While this is great for objects with non-specular (diffusing) surfaces, sometimes you actually want hard reflections for specular (shiny) objects, and this is not easily achieved with a shooting tent.

Instead, I settled on a shooting table. There are many varieties, and you can make one yourself, but I settled on this relatively inexpensive kit. It's fairly easy to assemble and disassemble, and it's very study. And best of all, it can be backlit!

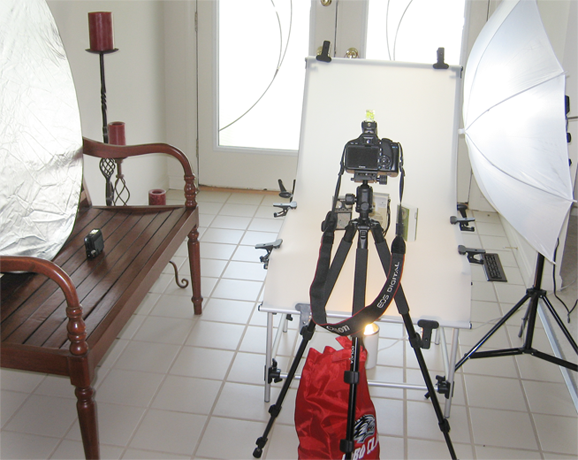
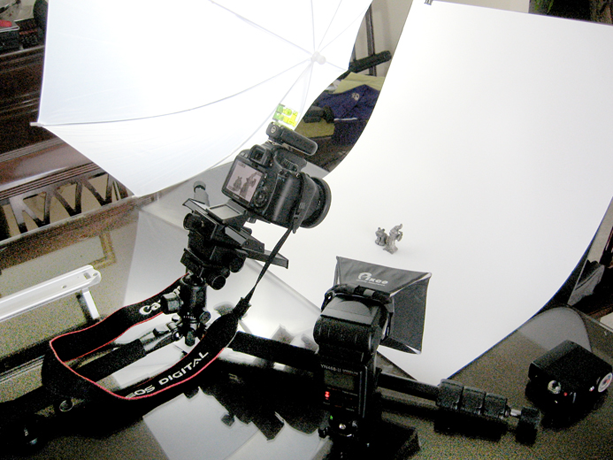
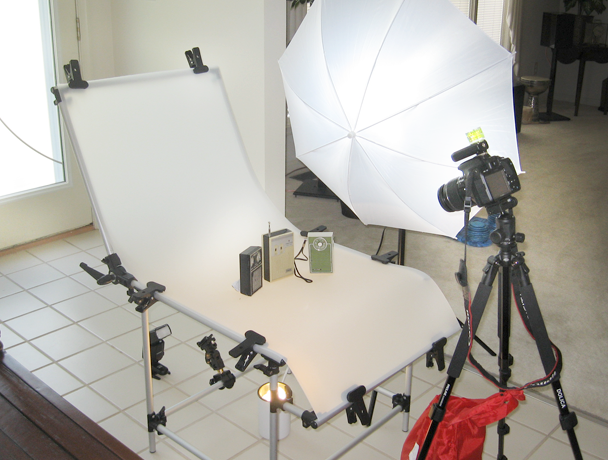
This shooting table comes with a stand, and a translucent plastic sheet that has a diffusive surface on one side. The sheet is quite thick, which makes it a bit difficult to manipulate, but that also means it's sturdy and resilient to stains. The sheet is clipped to the stand with spring-loaded hand-clips; the clips also enable other backgrounds to be attached. I have a small CFL light under the table to provide illumination for focusing and framing (basically a “modeling light”). My main strobe flash is on the floor under the table; there's also a bracket on the table stand to attach the flash, but I wanted the flash to be further away. The flash is attached to a radio remote that is triggered by a twin attached to the hot shoe on my camera. My slaved Vivitar flash is sitting on the bench and pointed at a silver reflector. This extra light source provides additional top and side fill light.

I did discover that my tripod is not sufficient for this type of photography. I had to adjust the legs to lean the camera over the table, but that made it unstable, hence the red bag of junk hanging from the balance hook. I will discuss my ultimate solution to this tripod problem in a future blog.

Here is the final image. I've done some minor post-processing in Photoshop to ensure a pure white background, and then I added shadows using this awesomely simple technique. In a future post, I'll show the processing steps in detail, which includes nine layers for the shadows; but note that it only took me about ten minutes using the aforementioned technique!

Well, that's it for today. I hope this helps your online selling. At the very least, these techniques will continue to transform your snapshots into photographs, even for everyday images. And, best of all, it's a lot fun!

Until next time, happy shooting!


Apple Aperture and Adobe Lightroom

Hey Everyone:

Today I'm going to very briefly discuss two software packages that enable you to maintain catalogs of your photographs, and that provide fairly sophisticated image editing capabilities. They are Apple Aperture (hereafter AA) or Adobe Lightroom (hereafter LR).

First and far most, AA and LR are cataloging packages for individual images. In this age of digital photography, libraries of photographs can accumulate into the thousands. Managing these can quickly become overwhelming.

Both packages offer powerful cataloging tools that enable you to classify, sort and maintain your image libraries. This is really key. Before I started using these, I would have to search through directory upon directory to find the image I wanted. I found myself wasting way too much time looking for a specific image. Now, once the libraries are built, it's much faster to find what I need.

While other software, such as Apple iPhoto (for Mac) and ACDSee (for Mac and Windows) provide basic cataloging, the features in AA and LR are much more powerful. In addition, while iPhoto and ACDSee offer basic image manipulation tools, AA and LR provide professional level tools. Both AA and LR provide tools for cropping, color correction, retouching, and support for RAW mode for most cameras. [I note that iPhoto and ACDSee continue to improve, so both are stil viable options to consider if they fit your needs.]

A full description of each is well beyond the scope of this blog, so I refer you to their respective websites: Apple ApertureAdobe Lightroom

What's the difference between AA and LR?

The main difference between the two is really tied to workflow.

LR is compartmentalized, and follows the workflow that would be typical when using analog media (film, chemicals, enlarger, photo paper, etc). In LR you import, catalog, develop, edit, export/print, and make slide shows and picture books. Each of these is basically a module designed to be roughly linear in flow.

In contrast to LR, AA is very free form, and similar to iPhoto; the user does whatever they want, at any time in the workflow. AA offers basically the same capabilities as LR, so the main difference is simply this workflow philosophy.

I should mention that both have fairly broad user communities, so there are resources, including presets and tutorials, for both. LR does have a larger community, though, and so there are more resources in general.

What about Photoshop or GIMP?

Importantly, neither package is a replacement for pixel-based editors like Adobe Photoshop (hereafter Ps) or GIMP, which have many tools the you won't find in AA or LR. In fact, for individual image manipulation (and for certain video and animation needs), Ps and GIMP can do anything that can be done with AA or LR, but offer more pixel-based capabilities. Anytime you need multilayering or masking, Ps or GIMP is a must. Also, even though you can do everything on single images with Ps and GIMP that can be done with AA or LR, it's often much more cumbersome; AA and LR take the low level tools of Ps and GIMP, and make them more user friendly and intuitive.

Also, neither Ps nor GIMP offer any kind of cataloging. They also don't allow easy manipulation of metadata in the image headers. This last point has become more and more important, as information packed into the image headers becomes more extensive.

In my, and most other's experience, you will definitely want to have both types or software. GIMP is free, but Photoshop is quite expensive. Fortunately, Adobe offers a slightly less powerful version, Photoshop Elements.

Which program is for me?

That's a tough question. Unfortunately, Apple has decided to stop providing a free trial version of AA. The software is fairly inexpensive (but still not cheap), and the lack of a try-before-you-buy version seems like a ridiculous move by Apple. This might not bode well for the future of Aperture. In sharp contrast, there is a free trial version for LR. This is, in fact, what enabled me to evaluate LR against AA, and ultimately change to LR.

There are many discussions of which package to buy. Most eventually come to two main conclusions:

Go with Aperture if you already have and use iPhoto. It's trivial to transition to AA from iPhoto. Also, go with AA if you want to make photo books seamlessly.

Go with LR if you prefer the linear workflow model, and you'd like the advantage of a very large community of professional photographers.

In the end, even though I already owned AA, I have switched to LR. For this old-timer, who cut his photographic teeth in a real darkroom with enlarger, chemicals, and paper, the LR workflow is more intuitive. In a little less than a day, I was able to build a catalog of my 10,000 or so images, and learn most of the features. Of course, there's always more to learn… That's what makes it fun.


Until next time,

Happy Shooting


Aperture, Shutter Speed, ISO Setting: Part 2 – Some Illustrative Examples

Hey Everyone:

In part one, I discussed the effects of Aperture (f/stop), Shutter Speed, and ISO Setting. I then presented you with some exercises to try that would illustrate the effects of these settings and how they are interconnected.

Today, I'm posting the results I got from doing these exercises myself. Even though I knew ahead of time what to expect in most cases, I ran into a few interesting surprises.

For all of the images shown, I shot in RAW mode. This produces larger files, but also maximizes dynamic range, reduces compression artifacts, and enables much better control and results in post-production. The RAW conversion was accomplished in Adobe Photoshop CS4, but no corrections were applied (just cropping, resizing and compositing). Click on the images for larger versions.

Exercises –

1) Shoot flowers in your yard. Set aperture priority and then photograph the same flower, but with different f/stop settings. What happens?

DoF

Since Spring is only now “springing,” I decided to photograph my favorite white, silk rosebuds instead of something outside.

For these photographs, I set my camera to Aperture Priority, Av on my Canon t2i (550D). As I increased the f/stop, the Depth of Field or Depth of Focus (DoF) increased – background objects became more and more in focus. This is great if you want to have objects at different distances stay in focus, but it's distracting when you want to highlight the main subject. A lower f/stop blurs the background, forcing your eye to look at the main subject, which is the flowers. This effect is very helpful for any scene with a crowded background (or foreground), and is essential for portraits.

2) Shoot running water, such as a stream, fountain or even a running faucet. Use shutter spread priority, and then take a series of shots at different speeds. What happens?

speed

I ran water in the kitchen sink, and photographed the scene with different shutter speeds. My camera was set to Shutter Priority, Tv on my Canon t2i.

The long, 5 sec exposure produced a very smooth stream of water; you can't see individual drops. As the shutter speed increased, individual water drops became resolved and finally “frozen” in time.

These effects can be used creatively. Very long exposures of rivers, water falls and moving clouds can really add drama and a feel of motion to your photographs. Of course, fast shutter speeds can be crucial for freezing action, especially in sports.

One important thing to keep in mind, however, is that the camera will have to adjust the aperture, and maybe the ISO setting, in order to achieve the correct exposure. In the running water images, you can see that the bottom right image is degraded by noise. This was caused by using a very short exposure in low light. The camera was wide open (so I had to carefully focus on a bottle at the same position as the water stream due to loss of DoF), and the ISO Setting was increased automatically by the camera to achieve correct exposure.

Note that slow shutter speeds can produce blurred images due to camera shake, so you'll need a tripod for some shots (I used a tripod for all of the shots in this blog post). Also, a Neutral Density (ND) filter is really important for situations where you want long exposures, but the scene is very bright, or you want a large aperture to control DoF. I'll discuss ND filters in a future blog.

3) Shoot a flat, well lit scene, such as a wall-hung picture. Set the camera to manual mode. Select a f/5.6 and shutter speed 1/125. Take a shot. Now change the f/stop to the next higher number (e.g., f/8) and shutter to the next longer speed (e.g., 1/100). Take a shot. Now try the opposite experiment. What happens? This should give you a feel for the interplay between f/stop and shutter speed.

Exposure

Here are two photographs of a reproduction Picasso painting that's been in my family since I was a kid. The two shots were taken in full Manual Mode with ISO 1600, and White Balance set manually to Fluorescent (this last bit isn't strictly necessary, but I didn't want anything to change in these photographs except Aperture and Shutter Speed).

The top image was taken with f/6.3 and Shutter Speed 1/60 sec. The bottom image was taken with f/8 and Shutter Speed 1/40 sec. Both images have the same Exposure Value (EV), meaning they both have the same range of brightness, even though they each have different f/stop and Shutter Speed settings.

Note that my Canon t2i has intermediate Shutter Speeds and Apertures, so simply changing the f/stop by “one click” does not mean a change in f/stop by “one stop.” [see part 1] The same is true of the shutter speeds. In these cases, the metered value measured by the camera will show you when the EV's are the same.

The point of this exercise was to illustrate the interplay between f/stop and Shutter Speed. Namely, that the same Exposure Value can be achieved using different combinations of f/stop and Shutter Speed, and that they are inversely related to each other. This is important to keep in mind when using either Aperture or Shutter Speed priority to get your shot.

4) Shoot a simple scene in low light. Set the camera to manual. Adjust the shutter speed and aperture to get a good exposure. Now take a series of shots with different ISO values, starting with ISO 100 and increasing by at least four or five settings. What happens?

ISO

For these images, I set the camera to Portrait Mode so that the camera would automatically adjust the Aperture (f/stop) and Shutter Speed, but let me manually adjust the ISO Setting. [Portrait Mode attempts to always use the widest aperture possible to decrease DoF, which is important for… well… portraits!]

You can see that as the ISO Setting increases, the images become noisier. In fact, this exercise revealed a surprise about my Canon t2i; the noise is not uniform in all three color channels. Even in shooting in RAW mode, the noise in the Green channel increases more rapidly than the Blue and Red channels. This causes a green color cast to the higher ISO images. Such a color cast can be adjusted in post, but it's annoying. I suggest testing you camera before you find yourself in a high-ISO situation; I had not know about this for my camera!

ISO_Zoom

These next two images show a zoomed region of the ISO 100 and ISO 12800 photographs. The increase in noise and annoying color cast are apparent. Such higher noise could really degrade an enlargement, even though there are plenty of pixels (and thus spatial resolution) in the image.

In general, you should use the lowest ISO Setting possible in any shooting situation. Again, this is especially true for portraits, and if you plan to enlarge the image for printing. If you use Av or Tv settings to achieve DoF or Shutter Speed effects, be careful if you have your camera set to AUTO ISO; you might get the shot, but it might be noisy. It's always better to set the ISO manually for important shots. If you can't get the correct exposure, then start adjusting the ISO Setting to larger values.

Having said all this, there are some situations where you just need to get the shot (like your kid sleeping in a darkened room with feet hanging off the bed). In those cases, turn on the camera's noise reduction (if not already engaged) or try to clean up the image in post. Note that cleaning noise in post-production inevitably leads to reduced spatial resolution, making the image blurrier. Again, this can be disastrous if you intend to make enlargements. Fortunately, Photoshop has a variety of noise reduction algorithms, some of which are not as aggressive and will cause less blur. Apple Aperture and Adobe Lightroom have noise reduction tools as well.

Well, that's it for today. I hope you learned something; I sure did. Give these exercises a try. If you do, let me know what happened.

Next time, I'll be posting a short discussion about Apple's Aperture and Adobe's Lightroom software packages, which enable you to handle RAW images, catalog your photographs and make corrections to them. I'll also explain why this die-hard Apple fan just switched from Aperture to Lightroom.

Until then, happy shooting!


Very Important – Using Vintage Flashes with Modern Cameras

Hey Folks:

Happy New Year!

Summary – don’t use an old flash unless you are 100% sure it won’t damage your digital camera. Read on to find out why!

For this blog post, I was originally planning to cover some basic camera functions that really improve your shots, but instead I’m going to review some informational about flashes that could potentially save you a pile of money, and keep you from “bricking” (frying) your digital camera.

Many of us old timers have some vintage equipment in the closet, garage or basement. When I was digging through my old Minolta equipment, I came across my trusty old Vivitar 235 flash.

It’s a dinosaur from the 1970’s, but in the days when cameras didn’t even have a built-in flash, it was all I could afford and it worked pretty well (especially held off-camera hooked to a PC sync cord).

Since I hadn’t gotten a new flash yet for my new Canon t2i (550D), I thought I’d just put the Vivitar on my new Canon. I don’t know why, but I decided to look up some info on using this old flash on my Canon, and discovered that using it would probably fry my new camera… Making it an expensive “brick” or doorstop! What?

It turns out that older flash gear typically used a higher voltage to trigger the flash than is used in modern systems… often 100-250 volts. This was before modern CMOS technology, when most electronics was still discrete transistors that handled high voltage and current. Modern camera equipment uses much lower voltages, typically 5 volts. So using an old flash has the potential to fry the new electronics.

Here’s some sites that list flash trigger voltages, here, here and here.

If you do want to use your old flash, I’d personally recommend only using it for off camera fills and special effects. In that case, I also recommend not triggering it with a PC cord connected to your camera… Just be safe. Instead, either rely on the flash’s slave features, or as I just did, buy a cheap optical slave adaptor. I found this helpful guide to optical triggers here. A brief overview of how to use that old flash for a range of applications can be found here.

Since my old Vivitar flash only has three power settings, I decided to get a Wein Peanut trigger bought from B&H, but is also available for Adorama. The system works great for my purposes; adding background bounce light, or special effects. The Peanut works great for my applications. If you need to trigger wirelessly, then you probably want to go with newer flashes anyway.

In closing, if you have an old flash, beware. You should definitely be very careful using it on your DSLR unless you are sure that it will not damage your gear. On the other hand, having some extra flashes around can be very useful.

Until next time.

Cheers,
Dean

Remember that the best camera is the one you have with you!

Welcome

Dean_Portrait_Catchlight

My first attempt at serious self-portraits.

Welcome to my new blog.  I plan to use this site to chronicle my new adventure through digital photography, but there may be a few outliers here and there.

I was very enthusiastic about photography in high school, being one of the main photographers for the yearbook.  I loved B&W photography using my trusty Minolta SRT-201, and spent many hours (actually weeks) in the school darkroom. This latter activity often left me with yellow fingernails; I know I should have worn gloves, but I loved to “feel” of developing a print.

Unfortunately, film and chemicals were expensive.  I tried the first digitals in the mid-90’s, but they were expensive and terrible.  When my son was born, I finally sprang for an Olympus C-2100 UZ, which was an awesome camera, but only 2.1 MP and there was no way to change lenses (although the optically-stabilized 10x zoom was fantastic).  After awhile, the grip padding came off (a known issue for these cameras), and I bought a point-shoot (Canon PowerShot A530)  ….and promptly lost interest in creative photography.

With the release of the Canon 550D (t2i), and other similar models, I started to get the itch to return to photography.  But photography has changed so dramatically since the late 70’s, that I’m basically starting from scratch.

This blog will follow me through the learning process.  I’ve done tons of research, and have found many helpful resources along the way; many are other blogs, some are dedicated websites, and some are eBooks!  I’ll make sure to list these along the way.

Thanks for dropping by.  If anything, I’m going to have fun sharing my experiences; and maybe some of you will find a useful tip or trick as well.

Cheers, Dean!