Hey Everyone:
In part one, I discussed the effects of Aperture (f/stop), Shutter Speed, and ISO Setting. I then presented you with some exercises to try that would illustrate the effects of these settings and how they are interconnected.
Today, I'm posting the results I got from doing these exercises myself. Even though I knew ahead of time what to expect in most cases, I ran into a few interesting surprises.
For all of the images shown, I shot in RAW mode. This produces larger files, but also maximizes dynamic range, reduces compression artifacts, and enables much better control and results in post-production. The RAW conversion was accomplished in Adobe Photoshop CS4, but no corrections were applied (just cropping, resizing and compositing). Click on the images for larger versions.
Exercises –
1) Shoot flowers in your yard. Set aperture priority and then photograph the same flower, but with different f/stop settings. What happens?
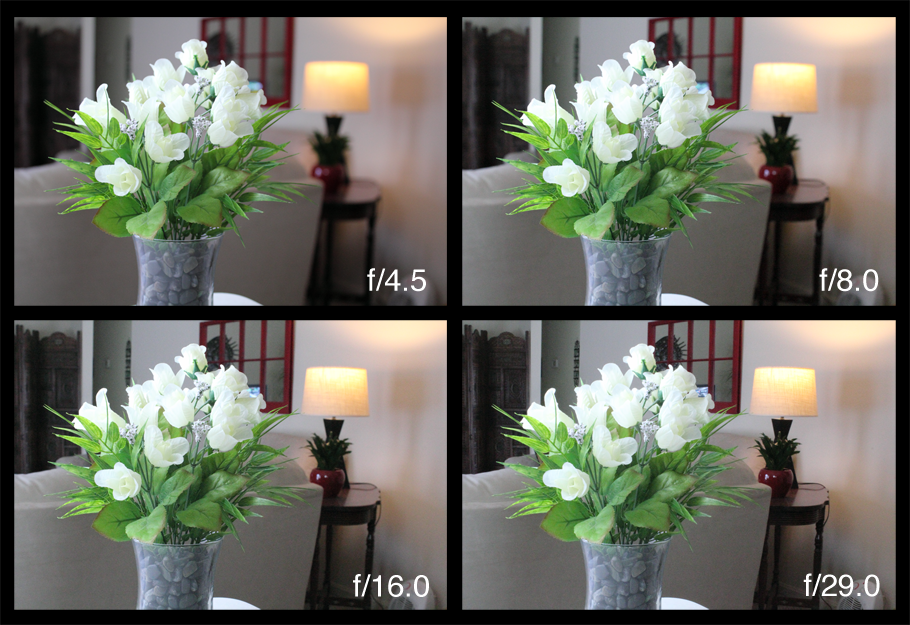
Since Spring is only now “springing,” I decided to photograph my favorite white, silk rosebuds instead of something outside.
For these photographs, I set my camera to Aperture Priority, Av on my Canon t2i (550D). As I increased the f/stop, the Depth of Field or Depth of Focus (DoF) increased – background objects became more and more in focus. This is great if you want to have objects at different distances stay in focus, but it's distracting when you want to highlight the main subject. A lower f/stop blurs the background, forcing your eye to look at the main subject, which is the flowers. This effect is very helpful for any scene with a crowded background (or foreground), and is essential for portraits.
2) Shoot running water, such as a stream, fountain or even a running faucet. Use shutter spread priority, and then take a series of shots at different speeds. What happens?
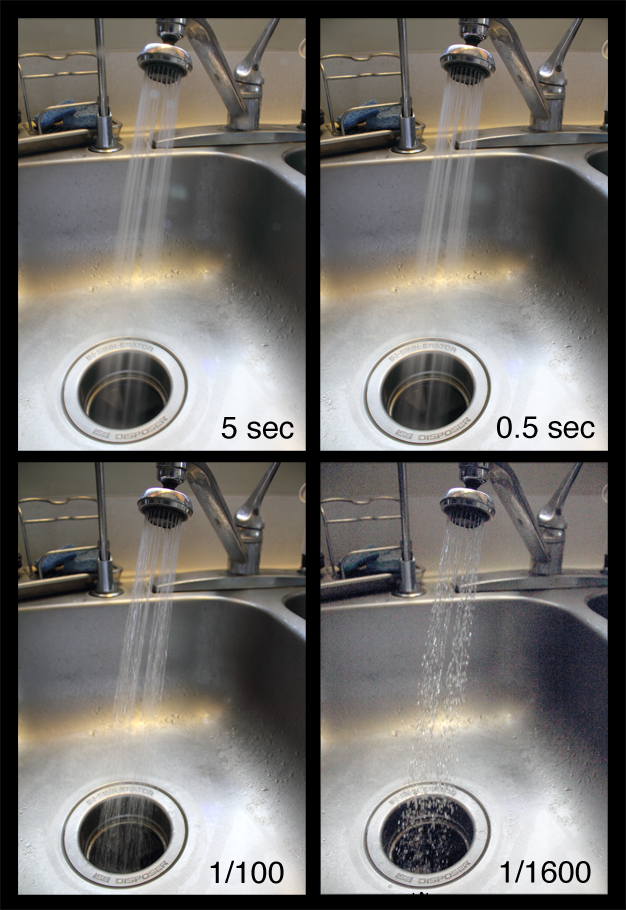
I ran water in the kitchen sink, and photographed the scene with different shutter speeds. My camera was set to Shutter Priority, Tv on my Canon t2i.
The long, 5 sec exposure produced a very smooth stream of water; you can't see individual drops. As the shutter speed increased, individual water drops became resolved and finally “frozen” in time.
These effects can be used creatively. Very long exposures of rivers, water falls and moving clouds can really add drama and a feel of motion to your photographs. Of course, fast shutter speeds can be crucial for freezing action, especially in sports.
One important thing to keep in mind, however, is that the camera will have to adjust the aperture, and maybe the ISO setting, in order to achieve the correct exposure. In the running water images, you can see that the bottom right image is degraded by noise. This was caused by using a very short exposure in low light. The camera was wide open (so I had to carefully focus on a bottle at the same position as the water stream due to loss of DoF), and the ISO Setting was increased automatically by the camera to achieve correct exposure.
Note that slow shutter speeds can produce blurred images due to camera shake, so you'll need a tripod for some shots (I used a tripod for all of the shots in this blog post). Also, a Neutral Density (ND) filter is really important for situations where you want long exposures, but the scene is very bright, or you want a large aperture to control DoF. I'll discuss ND filters in a future blog.
3) Shoot a flat, well lit scene, such as a wall-hung picture. Set the camera to manual mode. Select a f/5.6 and shutter speed 1/125. Take a shot. Now change the f/stop to the next higher number (e.g., f/8) and shutter to the next longer speed (e.g., 1/100). Take a shot. Now try the opposite experiment. What happens? This should give you a feel for the interplay between f/stop and shutter speed.
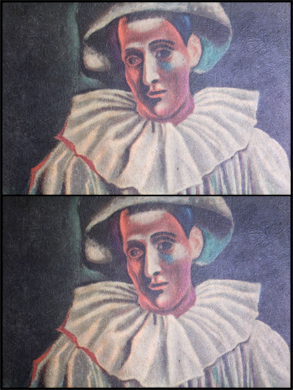
Here are two photographs of a reproduction Picasso painting that's been in my family since I was a kid. The two shots were taken in full Manual Mode with ISO 1600, and White Balance set manually to Fluorescent (this last bit isn't strictly necessary, but I didn't want anything to change in these photographs except Aperture and Shutter Speed).
The top image was taken with f/6.3 and Shutter Speed 1/60 sec. The bottom image was taken with f/8 and Shutter Speed 1/40 sec. Both images have the same Exposure Value (EV), meaning they both have the same range of brightness, even though they each have different f/stop and Shutter Speed settings.
Note that my Canon t2i has intermediate Shutter Speeds and Apertures, so simply changing the f/stop by “one click” does not mean a change in f/stop by “one stop.” [see part 1] The same is true of the shutter speeds. In these cases, the metered value measured by the camera will show you when the EV's are the same.
The point of this exercise was to illustrate the interplay between f/stop and Shutter Speed. Namely, that the same Exposure Value can be achieved using different combinations of f/stop and Shutter Speed, and that they are inversely related to each other. This is important to keep in mind when using either Aperture or Shutter Speed priority to get your shot.
4) Shoot a simple scene in low light. Set the camera to manual. Adjust the shutter speed and aperture to get a good exposure. Now take a series of shots with different ISO values, starting with ISO 100 and increasing by at least four or five settings. What happens?
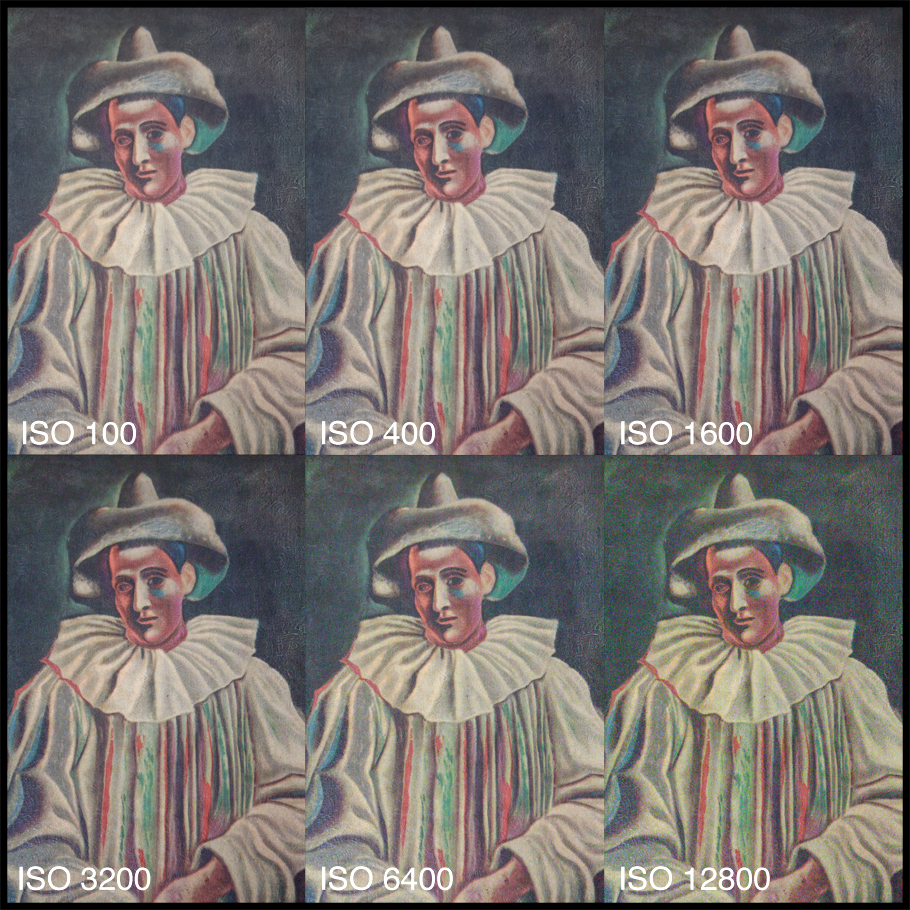
For these images, I set the camera to Portrait Mode so that the camera would automatically adjust the Aperture (f/stop) and Shutter Speed, but let me manually adjust the ISO Setting. [Portrait Mode attempts to always use the widest aperture possible to decrease DoF, which is important for… well… portraits!]
You can see that as the ISO Setting increases, the images become noisier. In fact, this exercise revealed a surprise about my Canon t2i; the noise is not uniform in all three color channels. Even in shooting in RAW mode, the noise in the Green channel increases more rapidly than the Blue and Red channels. This causes a green color cast to the higher ISO images. Such a color cast can be adjusted in post, but it's annoying. I suggest testing you camera before you find yourself in a high-ISO situation; I had not know about this for my camera!
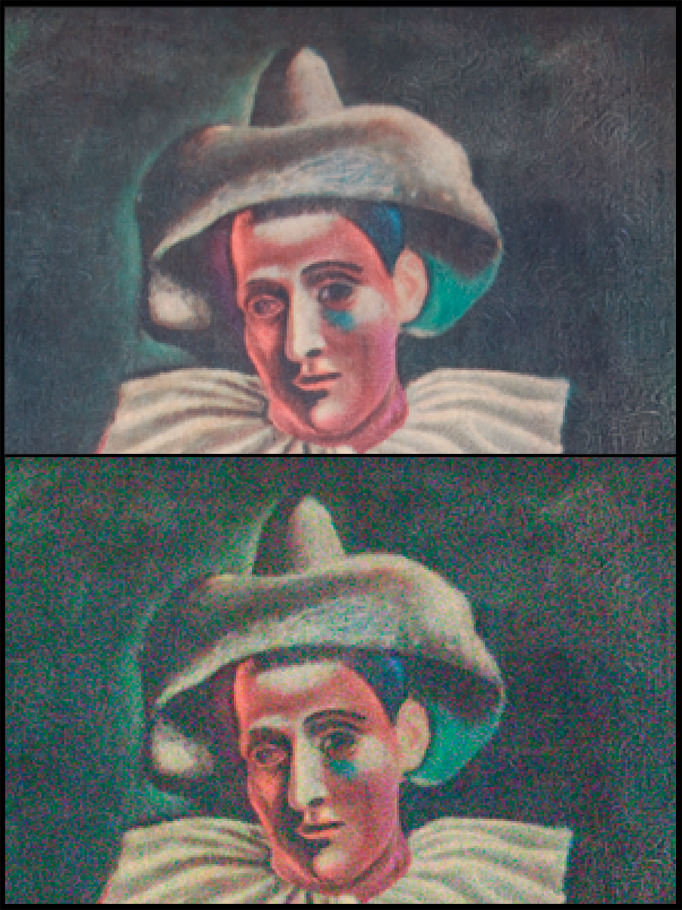
These next two images show a zoomed region of the ISO 100 and ISO 12800 photographs. The increase in noise and annoying color cast are apparent. Such higher noise could really degrade an enlargement, even though there are plenty of pixels (and thus spatial resolution) in the image.
In general, you should use the lowest ISO Setting possible in any shooting situation. Again, this is especially true for portraits, and if you plan to enlarge the image for printing. If you use Av or Tv settings to achieve DoF or Shutter Speed effects, be careful if you have your camera set to AUTO ISO; you might get the shot, but it might be noisy. It's always better to set the ISO manually for important shots. If you can't get the correct exposure, then start adjusting the ISO Setting to larger values.
Having said all this, there are some situations where you just need to get the shot (like your kid sleeping in a darkened room with feet hanging off the bed). In those cases, turn on the camera's noise reduction (if not already engaged) or try to clean up the image in post. Note that cleaning noise in post-production inevitably leads to reduced spatial resolution, making the image blurrier. Again, this can be disastrous if you intend to make enlargements. Fortunately, Photoshop has a variety of noise reduction algorithms, some of which are not as aggressive and will cause less blur. Apple Aperture and Adobe Lightroom have noise reduction tools as well.
Well, that's it for today. I hope you learned something; I sure did. Give these exercises a try. If you do, let me know what happened.
Next time, I'll be posting a short discussion about Apple's Aperture and Adobe's Lightroom software packages, which enable you to handle RAW images, catalog your photographs and make corrections to them. I'll also explain why this die-hard Apple fan just switched from Aperture to Lightroom.
Until then, happy shooting!

There are some interesting points in time in this article but I don�t know if I see all of them center to heart. There is some validity but I will take hold opinion until I look into it further. Good article , thanks and we want more! Added to FeedBurner as well