Hey Folks:
In today's post I will discuss lenses. This is probably one of the most complex subjects in photographic hardware. So I won't be comprehensive, but I will try to touch the basics and give you some ideas about what you need for good photography. Even so, this is going to be a pretty long post, so thanks in advance for reading it.
While a point-and-shoot camera can take good photographs, you are limited in the scope of possibilities by the lens that's built into the camera. That is where a Digital Single Lens Reflex (DLSR) camera becomes essential, as it enables a wide variety of lenses to be attached to the camera body. There are literally hundreds of types of lenses available, but today I'm only going to discuss a few basic types that I feel are important for maximizing your photographic potential. But first we need to define some terms.
Focal Length
This rather long section contains quite a bit of jargon. You might want to skip it if you just want to get to the main points of this blog.
The focal length for a single element lens is the distance from the collimated input beam (typically the midplane of the optical element) to the focused image. For a fixed entrance opening, the longer the focal length, the smaller the Field of View (FoV), and the larger the magnification. [See this very good wikipedia page as well.]. For multiple-element, photographic lenses, the listed focal length is the distance from the last nodal point (typically about at the mid plane of the last optical element at the back of the lens) to the focal plane where the film or sensor is located. Becasue interchangable photographic lenses were popularized with 35mm film cameras, most focal lengths are referred to a 35mm equivalent. In the film days, most 35mm cameras came with a 35mm, prime focus lens (see discussion of prime lenses below)! This is because a lens with focal length similar to the image size at the film or sensor is said to be a Normal Lens; it produces an image that most matches the FoV of a typical human visual FoV, and looks “natural” or “normal.”
But there's a catch… Most consumer grade DSLRs have sensors that are smaller than the format of a film-based 35mm camera, which means that the FoV for these cameras is smaller for a given focal length lens compared with the 35mm. Therefore, you have to adjust for the ratio of the size of the sensor versus a 35mm camera to figure out your actual FoV on the camera. Most consumer grade DLSRs use CMOS APS-C format sensors. For Canon cameras with an APS-C sensor, this translates to a “crop factor” of 1.6 smaller in format size versus 35mm. So a 50mm lens on a Canon would have an FoV of an 80mm lens on a 35mm film camera. The factor is ~1.5 for Nikon APS-C cameras. This is important to keep in mind, because lens manufacturers now build lenses specifically for APS-C format sensors, with the FoV tailored to match the size of the sensor even though the focal length is 35mm equivalent. Therefore a lens specifically made for a camera with an APS-C sensor will show strong vignetting around the image edges if mounted on a full-format (i.e., 35mm sensor) camera. Because lenses can be more expensive than camera bodies, you should consider buying full format lenses if you ever feel that you'll be upgrading to full format body anytime soon. Another advantage of full-format lenses used on a APS-C camera is that image quality is almost always best near the center of the FoV, so a cropped sensor will sample the best part of the image from such a lens.
Zoom vs. Prime Lenses
Now that you've waded through all that technical detail, let's move on to a discussion on the two main types of lenses, zoom and prime. A zoom lens enables you to select a range of focal lengths, while a prime lens has a single focal length.
Zoom Lenses
Most consumer grade DSLRs come bundled with an 18-55mm zoom lens. These lenses are typically lightweight and deliver decent images, but they won't produce uniform image quality over the entire FoV at all available focal lengths. They are, however, very handy especially if you are shooting in different situations that require different FoVs (I used the term FoV instead of distance deliberately). These kit lenses run a couple hundred bucks. You can upgrade to better quality optics and lens mechanisms for under $1000; a professional level zoom lens can run a couple thousand dollars.
– Some considerations for zoom lenses
The least expensive zoom lenses are typically fairly slow; their lowest f/stop is 4.5 or worse, which means they are limited in ability to photograph in low light and cannot produce shallow Depth of Field (DoF). [See my blog about Aperture, Shutter Speed and ISO Setting.] These lenses also have variable minimum f/stop; as the focal length increases, the f/stop increases (this is related to the entrance pupil). They also change their lengths dramatically as they zoom, and the front of the lens usually rotates as it is being focused. This last characteristic makes polarizing filters and “tulip lens hoods” difficult to use.

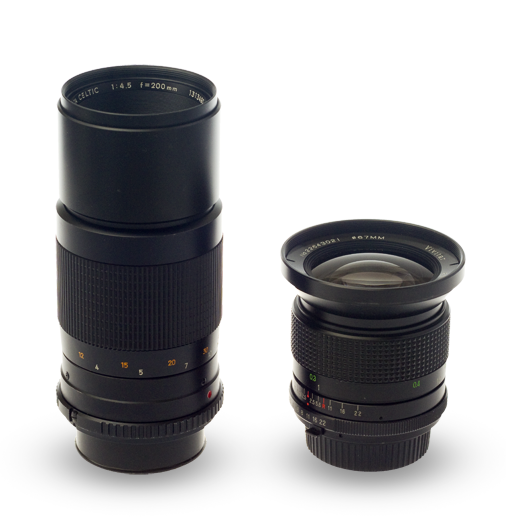
The image on the right shows two zoom lenses, the Canon 18-55mm kit lens that came with my Canon t2i (550D) and a Canon 55-200mm kit-grade ltele-zoom ens. At full telephoto with a lens hood, these lenses can be pretty unwieldy. Fortunately, their plastic construction makes them fairly light-weight. Many mid-range lenses also extend quite far, but the front doesn't rotate during focus.
The high-end lenses have a fixed size, can often have fixed f/stop over the full range of zoom, and are fast. However, they can be very expensive, and are usually much heavier than their lower priced cousins.
Prime Lenses
The alternative to a zoom lens is the prime focus lens. These lenses have a single focal length, and thus a single FoV. Because the optical train is simpler than a zoom lens, a prime lens is usually lighter weight, has better image quality, and is faster… all for lower price (usually). While the cheapest prime might have a rotating front end during focus, most do not, so polarizing filters and tulip lens hoods are unaffected by focus changes.
Prime lenses are manufactured with a huge range of focal lengths, from 6mm fish-eye to ~2000mm telephoto, and lots in between. [This is an interesting article about an extreme telephoto lens.] Most consumer and prosumer grade telephoto lenses have focal lengths below 500mm.
– Some considerations for prime lenses
The most obvious limitation of prime lenses is that they have a fixed FoV. This means that you, the photographer, must actually move to frame the shot! On the other hand, this really will help you to improve your photography, even when applied later to zoom lens shooting.
The biggest advantage of prime lenses, aside from image quality, is speed. A prime lens can have very low f/stops; down to f/1.2, for very reasonable prices. This enables shooting in very low light situations and gives very fine control over depth of field. This latter feature is crucial for many portrait applications.
Prime lenses also often have good manual focus rings and focus distance indicators. This can be very important to achieve perfect manual focus, especially for portrait situations.
Prime focus lenses are also the best for achieving high quality video. Again, because of image quality and fine control over DoF.
Other Lens Types
There are a slew of other lens types, from macro, to tilt-shift, to fish-eye, to pancake lenses. If you're really into the types of photography that require these specialty lenses, then knock yourself out. But most people will not need these. The one exception might be a good telephoto macro lens, because it can do double duty as a macro lens, and as a general purpose telephoto lens. I will discuss microphotography in a future blog…
Which Lens for Is for You?
This question is the subject of dozens of blogs and websites, and there is a range of answers. After spending literally weeks reading through these, it appears that there is some consensus on the basic lens toolkit.
For beginners and intermediate shooters, the standard 18-55mm zoom lens supplied with your DSLR is adequate for most situations, and will get you started. You can upgrade to a mid-level lens that covers the same focal length range, but will give you better aperture control, including lower f/stops, better autofocus mechanisms, and better image quality overall. [Image quality is a complicated term that encompasses many different things including the modulation transfer function (MTF) [see this article also], contrast, field distortion, and chromatic aberration.]
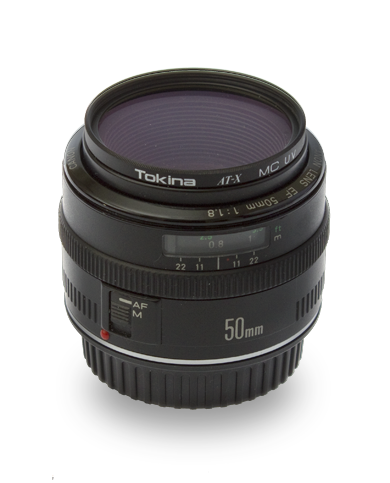
The consensus for a must have prime lens appears to be a 50mm, often referred to as a “nifty fifty” because it is so useful. It's preferable to get an f/1.4, but that can set you back a few hundred dollars. An f/1.8 can be had for as little as $100, and will still provide superior aperture control and image quality compared to the basic kit lens. I managed to find a used Canon 50mm f/1.8 Mark 1, shown in the image to the left, for about $150 on eBay. I mention this lens specifically because it is no longer made, but is a really great lens. Unlike the newer, and cheaper Mark II, the older lens has a metal (as opposed to plastic) mounting ring, and it has a wide manual focus collar with a distance gauge visible through a small window. These features make this lens extremely easy to focus, and is especially useful for racking focus in video. I use this lens quite a bit. It is perfect for shooting stills for stock photography and online sales. Attached to extension tubes, it also makes a very good, fast macro lens.
And finally, a telephoto zoom is also very handy to have in your camera bag, especially if you like to capture images of wildlife (including the human kind playing sports). These lenses typically range from 55-270mm, which complements well the standard 18-55mm kit lens. The entry level tele-zoom lenses are actually pretty good for most situations, but as before, upgrading to a mid-range tele-zoom will produce superior images and (usually) provide lower f/stops.
The biggest problems with these tele-zoom lenses (and all lenses to some extent) are field distortion and chromatic aberrations, which are usually worse near the edges of the FoV. This can be minimized by centering your subject and cropping the image in post. However, this violates one of the foundations of good image composition; namely the Rule of Thirds in which the subject is offset from the center of the image.
Some software can also use the lens prescription stored in the metadata for the image to correct field distorion and chromatic aberation (especially for images saved in RAW format), but software can only go so far… It's better to start with a quality image.
Having said this, I have an entry level 55-250mm tele-zoom lens from Canon, and… I love it! The image quality is more than adequate for online use, and Canon has done a very good job of controlling distortion and chromatic aberration. The only issue I've had is that the lens is rather slow, which makes low light shooting difficult, and shallow DoF impossible.
Even if you opt for an entry level tele-zoom, make sure it has image stabilization. At focal lengths greater than ~100mm, it's very difficult to minimize camera shake. And because these lenses are slow, you'll need to use a long exposure time to capture the scene without increasing the ISO setting to unacceptable levels. This is actually true even for mid-range lenses… The limiting factor in your telephoto images will likely be image shake, not the quality of the lens. Of course, using a tripod will reduce camera shake dramatically, so I highly recommend having a quality tripod if you plan to shoot telephoto. [See my blog about tripods.]
One final consideration for any lens is its imaging capabilities as a function of f/stop. There are two aspects here: a) the quality of the image as a function of f/stop; and b) the actual construction of the iris that controls the size of the aperture. Most lenses have a sweet spot in the f/stop range, which is typically around f/8. This should be kept in mind when shooting critical shots, such as portraits or scenes with fine detail over a wide FoV.
In addition, the number of blades in the diaphragm, and their shape, can affect the image quality. While usually not noticeable in the focused part of the image, the diaphragm structure will affect the quality of the out of focus areas. This may seem silly. After all, the out of focus parts are… well… out of focus! But this is actually very important, especially if the out of focus areas contain light sources. The out of focus areas of an image obtained with a lense of finite aperture are called bokeh. Note that this is not simply a blurred area, it has structure imprinted by the shape of the diaphragm; features closer to or beyond the Depth of Field (focus) will appear to have the shape of the diaphragm. So if the lens diaphragm has five straight-edged blades, the bokeh features will also be pentagonal. [For all you atronomers and optical geeks like me, this is formally an image of the exit pupil, which is is itself an image of the diaphragm.] Such bokeh features can be very distracting in images with background lights such as candles or city scenes at night. It can really trash an otherwise great wedding shot. Just be aware. Less expensive lenses usually have less elaborate diaphragms, but even some more expensive lenses can suffer from this problem. Just be aware of the issue, and select a lens that meets your needs.
[Note that you can use the fact that the bokeh contains images of the entrance pupil to do some rather creative effects.]
A Final Note About Vintage (Legacy) Lenses
Some of us old-timers have lenses lying around from our days with film cameras. In my case, I have a Vivitar 28mm wide angle and a Minolta/Celtic 200mm telephoto, both with manual focus only and made for Minolta bayonette mounts. These lenses aren't worth much (about $20-30 on eBay), but the Vivitar has very nice optics, and it's fast (f/2.5). Old lenses are cheap and pretty easy to acquire. It might be a good idea to grab one or two if you see them at a thrift store or pawn shop.
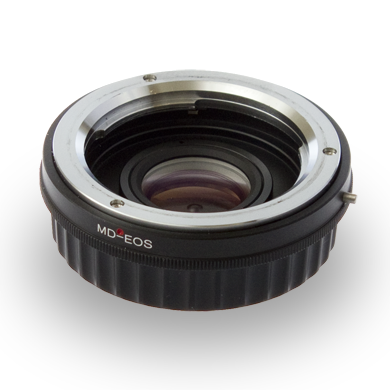
Given that I already had a couple of lenses, I decided to get an adapter to mount them on my Canon t2i. You can get simple adapters for about $15-20, but these act as extension tubes, increasing the magnification of the lens by at least 2x. So, instead I opted to pay an extra $15 for an adapter that also has a corrective optic that is suposed to preserves the magnification of the original lens. Note that because these vintage lenses were designed for 35mm film cameras, the APS-C sensor will crop the image. But keep in mind that the original lens was designed for 35mm film cameras, so there will be a crop (see below).
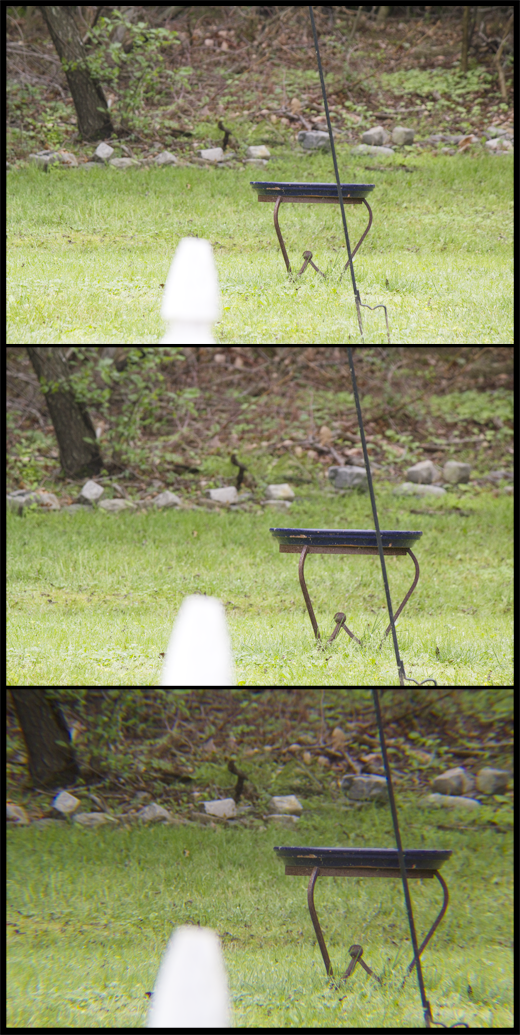
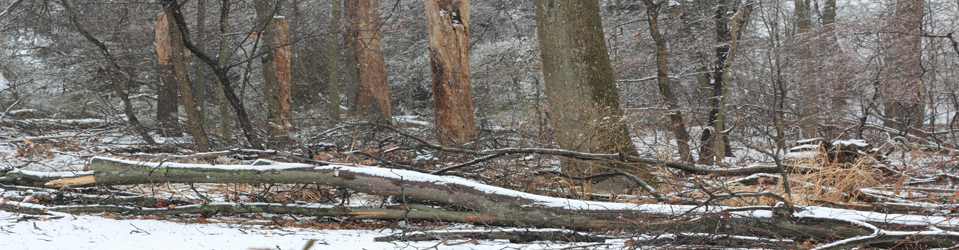
Not surprisingly, the adapted telephoto produce poorer quality images than the Canon. The Celtic lens has really cheap optics anyway, so I didn't expect much. There is strong distortion and chromatic aberration at the edges of the frame, and stopping down the aperture doesn't improve things. The images on the right show a comparison between my Canon 55-250mm lens set at 200 mm, my Canon set at 250mm, and the Celtic 200mm telephoto, both set at f/8, and shot with Shutter Speed 1/60 and ISO 400. Even though the optics in the adapter are supposed provide a 1:1 image, there is still some extra magnification as evidenced by these comparison images. The good news is that the adapter does manage to preserve much of the image throughput; it preserves the approximate f/stop capability of the lens when mounted on the Canon.
The situation is similar with the Vivitar lens. However, the superior quality of the Vivitar optics is readily apparent. The image to the right shows a comparison between the Vivitar and my 18-55mm kit lens set at 28mm. Both images were taken at f f/3.5, since that is the fastest my kit lens will achieve. Both used ISO 400 and 1/60 Shutter Speed.
After my first draft of this blog, I did some additional research on the Vivitar 28mm f/2.5. Apparently, it is becoming quite a coveted lens for indie film makers, which is driving up the resale value. So the budget-minded might consider the vintage lens route; you won't get autofocus and image stabilization, but you can get very high quality glass. And with steady-cam rigs and tripods, the lack of image stabilization may not be a big issue, especially for shorter focal length lenses.
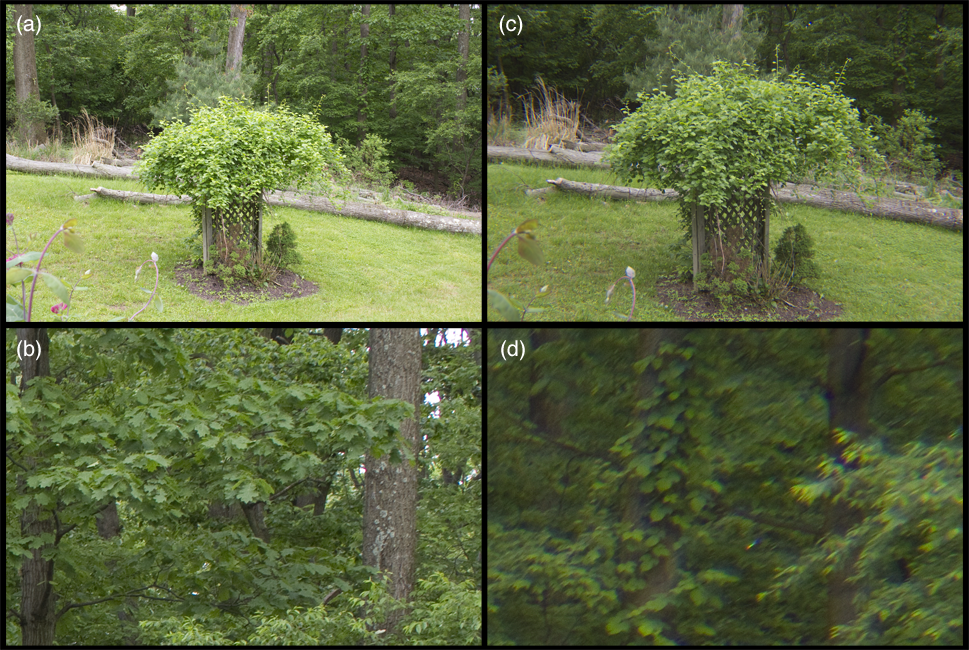
The image left shows a comparison between my kit18-55mm lens set at 28mm, and my Vivitar 28mm. the images were taken with f/stop f/8, Shutter Speed 1/60 and ISO Setting 400. (a) and (b) show the full frame of the kit and Vivitar lenses, respectively. (c) and (d) show an enlargement of the upper right-hand corners of (a) and (b). The kit lens produces good images even in the corners, but the adapted Vivitar is pretty terrible. I'm pretty sure that the adaptor optics are to blame here. But as I stated earlier the Vivitar is much faster. So I plan to hang onto the lens, especially for video.
Well, that's it for today. Thanks for slogging through this long post. I hope it gave you some ideas and information. Buying a camera body is just the beginning… It's the lens that makes the image. But most important, it's the person using the camera that makes a photograph. No matter how good the equipment, bad technique will not make a good photograph (I know… I take tons of bad pictures). On the other hand, good technique can do wonders with limiting and limited equipment. With the three lens types suggested herein, you should be able to tackle most any situation, or learning experience. Then, when you find that you need to upgrade, you'll have developed the chops to make the most out of that new equipment!
Happy Shooting!
PS – There are many, many great websites for photography, and I encourage you to visit them. But there are two that I go to regularly for information on specific equipment. They are dpreview.com and steves-digicams.com.
PSS – Here are two additional links to articles about lens selection. Article one, and article two.
